Showing posts with label Network. Show all posts

Monday, 8 April 2013

Hosting a Web Site on BT Broadband - Configuring BT Home Hub

Configuring your BT Home Hub - Port Forwarding 


Following on from my previous Blog posts about setting up a "hobby" web site that is hosted at home using your BT Broadband, the next article covers how you can make the server you are configuring available for browsing.

Your BT Home Hub comes with a Control Panel that allows you to configure some basic and more advanced settings.  This can be access using the following URL (web address), this is the BT Home Hub Manager Home Page:

http://bthomehub.home/

The BT-Home-Hub-Manager - bthomehub.home

The BT Home Hub Manager Home Page should show your available BT services and the computers (and other devices) that are connected to your Home Network.  It's important that the computer that you are intending to use as your Web Server is visible in the list entitled "My Home Network".  More about your server on your home network can be seen in the previous Blog post about Setting up your Local Network.

To configure the necessary settings that will allow your server computer to act as a Web Server on the Internet, you will need to access the Settings pages.  This will require a login after clicking the "Settings" tab on the Home Hub manager page main menu.
BT Home Hub Manager - Settings (Log in)

To make your Web Server available to the Internet, you will need to add some new settings within the "Port Forwarding" section of the Control Panel's settings.  Port Forwarding is used by devices and applications, such as servers, to make sure that data coming from the Internet gets to the device that needs to use it.  When Port Forwarding is enabled, your BT Home Hub will send all incoming traffic for that application to the chosen device. 
BT Home Hub Manager - Port Forwarding
This is required because your BT Home Hub only has one ip address and yet you will (possibly) has several devices (including the BT Home Hub itself) that incoming traffic needs to access.  Once things are configured correctly, a request from the Internet to the ip address of your Home Hub will be forwarded on to the appropriate device based on the correct port.
BT Home Hub Manager-  Select Devices
This process involves selecting a "game or application" from the list of available in the drop down menu to the left of the page.  There are quiet a few pre-configured entries to choose from, but you need to look for the ones related to "http" and "Web".  There should be for relevant entries in total.  These are as follows:

  • HTTP Server (World Wide Web)
  • HTTPS Server
  • Secure Web Server (HTTPS)
  • Web Server (HTTP)

As far as I can see, there seems to be some duplication here.  I would personally suggest that there are only really two options here, for http and https (the secure/encrypted version of the protocol), but selecting everything doesn't seem to cause any conflicts and everything works perfectly well when you do.

  • HTTP Server (World Wide Web) is the same as Web Server (HTTP)
  • HTTPS Server is the same as Secure Web Server (HTTPS)

I presume the doubled up entries are just to make it easier to find the appropriate thing dependant on the terminology used?  e.g. Some people will look for web server whilst others will look for http.  It's also unlikely that you'll actually need to use the Secure http (https) for secure/encrypted web pages, but there's no harm in setting it up ready for later.

In my case, the server that I want to use as a web server had been named as SERVER-03, but yours will very likely be something different.  It is just a case of now finding the four entries in the "game or application" list and then selecting the appropriate computer from the "Devices" list on the right hand side of the page.  Each time you select the necessary application and the chosen device a button becomes available to allow you to "Add" the settings to the list.


What this process is effectively doing is setting up the rules relating to which port belongs to which device, and that access to this port will be permitted through the BT Home Hub Firewall.  The settings are not really visible, as you are just selecting an application that's already been configured on the Home Hub, but the port that is normally used (the standard or expected port) for web servers is port 80.  Therefore, to check that the settings have been effective, you need to check that the port is now open and can be used.  To do this, you can use a test that is available through various downloadable applications or more easily on some network and configuration tools within web sites.  I have previously used the Open Port Check Tool on the following web page to Test Port Forwarding on my BT Home Hub:
 
http://www.yougetsignal.com/tools/open-ports/

Yougetsignal.com - Open Port Check Tool
To use this page to check, you need to ensure that the "Remote Address" is set to your current external ip address (there is actually a link under the input field to "Use Current IP") and that the port number input field has the number "80" in it.  When you click the "Check" button, you should see a green flag and the message "Port 80 is open on xxx.xxx.xxx.xxx", where xxx.xxx.xxx.xxx is your current ip address on the Internet.

Having got this aspect of you home hosting set up to work, if you haven't already, you need to consider the Domain Name and set up the Dynamic DNS.  The full set up related Blog posts are as follows:


Tuesday, 19 March 2013

Hosting a Web Site at Home on BT Broadband

Using a Home Network to Host a Web Site
(BT Home Hub)

In the following few articles, which I will post next month, I will be writing about how it is possible to set up and host your own web site from home using your broadband connection and in my case the BT Home Hub.

Since the early days of designing and building web sites a lot of my work has been done on a local server.  I'm a Microsoft Windows user and most of their operating systems will give you access to their web server software, which is not too dissimilar to the commercial version that you'd get with specifically built server operating systems, such as windows 2008.  The web server software is called IIS (Internet Information Server) and when enabled in Windows will allow you to properly serve and view your web pages as if they were coming from a web server.

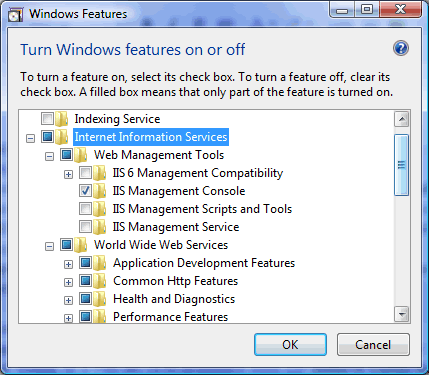
If you wanted to have access to IIS on your Windows computer to see how it works, then it can be added through the Control Panel's "Programs and Features" option.  This is where you would normally (as it was called in older operating systems, such as Windows XP) "Add and Remove Programs".  As well as the features you have possibly seen to uninstall software programs, there is also an option to "Turn Windows features on or off".

The Control Panel's "Programs and Features" option
Selecting the checkbox for the Internet Information Server will automatically select al the necessary sub features, and there's probably no reason to disable any of those.  The older operating systems used to require the original Windows OS installation CD (or DVD) at this stage, but that shouldn't be the case with more up to date systems such as Vista or 7.  I can't comment about Windows 8 at this point, as I haven't yet tried it.

Turn Windows features on or off
Anyway, moving on!  It's not my intention to write about the task of installing IIS and the basic configuration of IIS in this article, as I'm sure it's been done many times before.  However, it is an essential part of the hosting set-up, so it warranted a mention.  Once you're up and running you'll end up with the ability to serve web pages locally on on your local network using the normal protocol for this, which is http (Hypertext Transfer Protocol), and the hyperlinks and source files will behave properly, as compared to viewing a web page you have authored directly from you file system (i.e. a folder on you C: drive for example).  On a local machine you will be generally able to browse a web site you are developing from a local domain (normally http://localhost/) or an ip address.  The localhost ip address is usually 127.0.0.1 (http://127.0.0.1/).

Ok that's enough about the local server config.  If you like to know more about that one, I'd suggest a Google search for something along the lines of "running IIS locally".  I haven't looked too far through the available articles, but this one titled "Setting up a web site on local machine using IIS" seems to explain the basics OK.

I am sure, there will be plenty of useful information already out there!

As far as what you will need to know about, to get a computer up an running on your local network, serving web pages and visible to the outside world using your BT Home Hub, this will be covered in the following topics:
It's all reasonably straight forward, and whilst I would certainly not recommend this type of home network hosting for anything commercial, or anything that needs reliable bandwidth and up-time, it can be an interesting way of learning about the configuration when your not able to get you hands on the servers normally.  For example, in my last job, I was involved in sales and for security reasons (we dealt with credit card payments etc.) I couldn't get access to our Windows Servers, so I used to keep things set up at home for hobby web sites that allowed me to keep my hand in on the practical side.  Also, for somebody leaning about web design and development, it's also a could way of having a go and experimenting with the set-ups without compromising anything that's too important, such as commercial web sites.

Please keep and eye out for my future posts, which will hopefully help you understand how the necessary components all fit together.